43. Granular Post Processing
Note
Feature requires a Momentum Granular license
Post-Processing of the external journals created from External Simulation is done via the Journal Viewer. This section will outline some of the more important functionality used in the Journal Viewer.

43.1. Playback Controls
The playback of the recorded simulation journal can be controlled by the user through the playback buttons on the playback bar.

Play/Pause: Start playback of the recorded simulation. If playback is active, the button will be replaced by a pause button.
Stop: Stops the current playback and jumps to the beginning of the journal.
Step Backward: Steps backwards a simulation frame.
Step Forward: Steps forward a simulation frame.
Decrease Frame Stride: Decreases the frame stride of the playback.
Increase Frame Stride: Increases the frame stride of the playback.
Current Frame Stride: The current frame stride of the journal. The frame stride determines how many recorded simulation frames that the journal should jump for each step taken during playback.
43.2. Keyboard shortcuts
Key |
Description |
|---|---|
e |
Play/Pause playback. |
l |
Set the light source in the direction of the camera. |
c |
Begin image capture used in video generation. |
F12 |
Take a screen shot. |
p |
Toggle View/Hide side docket. |
Home |
Toggles collision mesh rendering. |
m |
Save current camera view. |
Page up |
Select the next camera view stored. |
Page Down |
Select the previous camera view stored. |
h |
Opens a view with the currently stored camera views. |
k |
Saves the currently stored camera views to an external .cfg file. |
Decreases the camera clip plane, which is parallel to the view plane. |
|
Increases the camera clip plane, which is parallel to the view plane. |
43.4. View
This menu controls some of the different views in the journal.
Draw Mode: Specify the draw mode of the meshes in the scene.
The user can control the clip plane in the camera direction. This can be used to create cross-section views.
Increment Clip Plane: Increment the clip plane forward in the camera direction.
Decrement Clip Plane: Decrement the clip plane backwards in the camera direction.
Toggle View SideDocket: Toggles whether the side docket should be shown or not.
43.5. Rendering
Debug Rendering: Toggles debug rendering of the scene.
Standard Rendering: Toggles standard rendering of the scene.
Particle Shader: Select the particle rendering technique.
Algoryx Logo: Toggles whether the Algoryx logo should be shown or not.
43.6. Cameras
Different camera views of interest can be stored in an internal list to quickly switch between them. The internal list can be saved to an external file which can be loaded to restore the views to the internal camera view list.
Open Camera File: Opens a specific .cfg file containing camera view specifications.
Save Camera File: Saves the current internal camera view list to an external .cfg file.
Store Current Camera: Stores the current camera view in the internal camera view list.
Show Camera List: Shows the internal list of stored camera views as a right docket list.
Next Camera: Increment the current camera view to the next view in the internal camera view list.
Previous Camera: Decrement the current camera view backwards in the internal camera view list.
43.7. Post Processing
The post processing functionality can be found at the left dock widget. The visualization of the dock widget can be turned off by selecting View->Toggle View SideDocket.
43.7.1. Analysis Box
An analysis box with input for center and size can be defined which is used in the coloring functionality, where coloring of particles can be restricted to a specified volume in the simulation.
Use Analysis Box: Specifies whether the Analysis Box should be used in the simulation or not.
Center: Specifies the center of the analysis box in the simulation.
Size: Specifies the size of the analysis box. These values represent the total size of the box in each axis.
43.7.2. Scalar Coloring
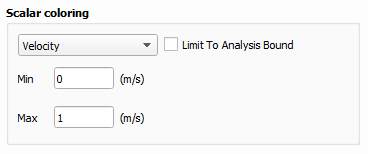
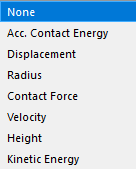
Granular particles can be colored by a set of different scalar properties. The coloring options can be found under the “Coloring” tab in the left docket view. The scalar coloring will color particles in a color interval starting with the minimum specified value to the highest specified value. Once changes to the settings are complete, “Apply” can be pressed to update the visualization.

Limit to Analysis Bound: If the Analysis Bound is active, the scalar coloring can be limited to the volume in the bound.
Remember that the granular particles can only be colored from information that is stored in the journal. If, for example, velocity information is not stored in the journal, then velocity coloring cannot be applied. Also, kinetic energy information is derived from the stored velocity.
Attention
Height coloring can be used to color particles relative to their height inside the Analysis Bound.
Min: The minimum specified value. Units depends on the selected scalar property.
Max: The maximum specified value. Units depends on the selected scalar property.
Show Legend: Shows a legend displaying how colors corresponding scalar values.
43.7.3. Scalar properties

Displacement: Colors particles relative to their displacement. The displacement zero point is reset every time coloring settings are updated via pressing “Apply”.
Radius: Colors particles relative to their radius.
Contact Force: Colors particles relative to their accumulated contact force. Only works if contact information is stored in the journal.
Velocity: Colors particles relative to their velocity. Can only work if velocity information is stored in the journal.
Height: Colors particles relative to their height.
Kinetic Energy: Colors particles relative to their kinetic energy. Can only work if velocity information is stored in the journal.
43.7.4. Render filter
A render filter can be applied to filter out visualizations of particles relative to a scalar value. Particles with scalar values under the specified threshold will be hidden in the visualization.
Velocity: Filters out visualization of particles relative to their velocity.
43.7.5. Particle Primitives
Different additional rendering modes exists to augment the visualization of the granular particles.
Render Particles: Specifies whether the default particle primitives should be rendered or not.
43.7.6. Trajectory Lines
Trajectory lines of particles can be created to follow their movements over time in the simulation.
Number of positions: Specifies the number of position points that should be included in the trajectory.
Sample: Specify the quota of particles that should be used in the trajectory coloring.
43.7.7. Contact Network
This option allows the user to render the contact network of all the particles in the simulation. This requires that the granular contact information is stored in the journal, see External Simulation. The contact force lines are scalar colored according to the specified interval given by the Min and Max force inputs.
Render Contact Network: Specifies whether the contact network should be rendered or not.
Min Force: Specifies the min force of the coloring in a contact line.
Min Force: Specifies the max force of the coloring in a contact line.
Attention
It can be a good idea to disable rendering of particles via the “Render Particles” option. Otherwise the rendered network will be occluded.
43.7.8. Video Generation
It is possible to generate videos from recorded journals. Video generation settings can be opened by pressing the keyboard key v, or by selecting Video Generation Settings from the Media options list.
Video Output: The filename that will be used in the created video.
Quality: The quality of the generated video. Higher quality will result in bigger files.
FPS: The FPS of the video generated. Max FPS denotes the maximum FPS allowed which is equivalent to the Record Frequency of the journal.
Real Time Factor: The real time factor of the generated video which governs the replay speed of the video. Values below 1 will cause the video to play in slow motion and values above 1 will result in a speedup. This value is limited by the journal Record Frequency as well as the requested FPS of the generated video. You could not, for example, create a 30 FPS video with a real time factor of 0.5 when the journal Record Frequency is 30 FPS. The minimum value that can be taken is displayed under Min Value.
Finalize Video: When the video capture has recorded a set of frames, the video can be finalized by pressing the Finalize Video button. Video generation needs to be active before the video can be finalized.
Video capture can be toggled by pressing the keyboard key ‘c’, or by selecting Video Capture under Media settings. When the recording is done, the video can be finalized by pressing Finalize Video under Video Generation Settings.