10. Simulation
This tab group contains the commands for configuring a simulation, starting a record of a simulation, stopping and stepping a simulation. It also contains a tool for analyzing a recorded simulation, Simulation Report.
10.1. Activate

When a new document is opened/created, the Activate button appears, both in the Simulation ribbon as well as in the Simulation Structure. Clicking this button will activate the Algoryx Momentum add-in for the document. If the SpaceClaim document contains one or more components, you will see one body in the Simulation structure representing the whole model.
All components will be collected into one Rigid Body.
The gravity direction will be estimated from the current view so that the design view axis (x, y, or z) closest to down (in the screen) will also be used as down in gravity.
A default Simulation Frequency will be selected (300 Hz).
You might get a warning that “Windows Firewall has blocked some features of this program” when activating the add-in for the first time. This is due to the plotting framework, and you should enable it for private networks.
10.4. Settings

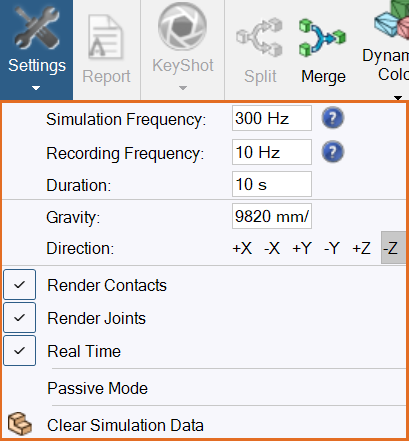
The Settings button will bring out a pull down menu with the settings for the activated simulation.

The simulation settings will be stored in the document.
Simulation Frequency: The update rate of the simulation. Can be specified as frequency: Hz, or as a time step: ms, s. For example: 100Hz will use the time step of 0.01 seconds. 1ms will be converted to 1000Hz. Choosing the correct simulation frequency is important to get stable simulations.
Recording Frequency: The rate in which the simulation is recorded to disk. See Simulation Recording. Can be specified as frequency: Hz, or as a time step: ms, s. For example: 100Hz will use the time step of 0.01 seconds. 1ms will be converted to 1000Hz. The recording frequency cannot be higher than Simulation frequency.
Duration: The maximum length of the recorded simulation.
Gravity: Specifies the magnitude and the direction of the gravity. Pressing one of the directional buttons will align the gravity along the selected world axis.
Render Contacts: If enabled, the contacts (point and normal) will be rendered during recording and playback.
Render Joints: If enabled, the joints will be visible in the design view.
Real Time: If enabled, the update of the rendering in SpaceClaim during recording will be synchronized to real time (if possible). If it is disabled:
Recording will be done as fast as possible. Priority is on the simulation, not on updating the graphics.
When starting a recording, a previously recorded part will be skipped, jumping directly to recording.
Passive Mode: If enabled, Algoryx Momentum will work in a so-called passive mode. The purpose of this passive mode is to improve CAD construction performance when working with large models containing thousands of components. This is achieved by limiting the number of tasks that Algoryx Momentum performs during each user operation. In this mode no rigid body properties such as center of mass, inertia tensor, etc. are calculated and they will therefore have undefined values until either passive mode is disabled or the Simulation button is pressed. Generally the passive mode doesn’t affect the working document but there are some exceptions:
Placement of the spring-joint between two rigid bodies will not work if the center of mass of the base component is not calculated. However, if the center of mass of the base component is calculated, as is the case after a simulation is complete, the spring-joint placement will work properly even in passive mode.
The rigid body center of mass and bounding box visualizations are not updated in passive mode until a simulation is started or the passive mode is deactivated.
The Simulation Structure will be hidden by a large refresh button which could be pressed to show, access, or modify the Simulation Structure.
There will be no coloring of rigid bodies via e.g. Dynamic Color or when the Material Pairs menu is activated.
Clear Simulation Data: Pressing this button will (after a confirmation request) clear the model from all simulation data, including joints and simulation structure. The result is a clean SpaceClaim document without any references to Algoryx Momentum add-in.
10.5. Simulation Report

The Simulation Report will give you a summary of the simulation. It is also a tool for analyzing a recorded simulation for largest speed, smallest geometry features etc. See Simulation Report. This button is only activated if we have a recorded simulation in the Playback Tab, i.e. a simulation must have been started at least once before this button is activated.
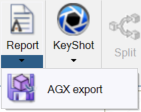
AGX Export

When the Simulation Report button is active the drop down menu on the button has an option to export the model as an AGX-file. Press AGX Export and choose a file name to save the model as an AGX-file together with render data, see Export.

 ) will stop the simulation/playback.
 ) will record one step at the time. If a recorded simulation exists, it will playback one step at the time, until time reaches the end of the previous recording. Then it will record one step. The length of this step is determined from the