23. Joints
Joints remove degrees of freedom between a rigid body and the world, or between two rigid bodies. Some joints also have motor, spring and range modifiers. Common to all joints is that they can be attached to one rigid body (and the world), or two rigid bodies, of which at least one must be a dynamic one (or the joint will be disabled). Available joints:
23.7. Creating a Joint
A joint can be created in various ways.
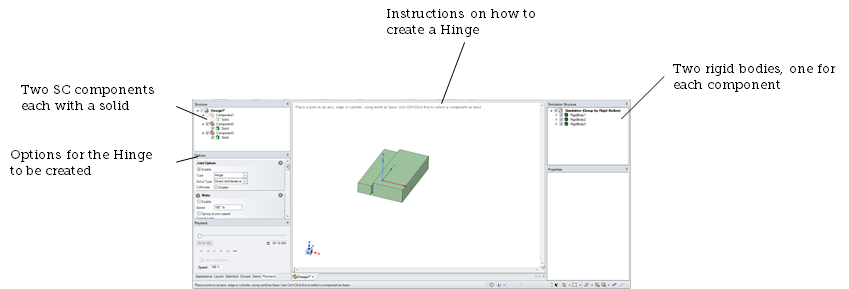
Using the tool for the specific joint, Ctrl-clicking on a component in the one rigid body, then on an edge or an axis a component in another rigid body. This will create a joint between the two rigid bodies.
Using the tool for the specific joint, and clicking on an edge or an axis belonging to a component which is part of a rigid body. This will create a joint between the world and the rigid body.
Using the Detect Joints.
When manually creating a joint like in 1. or 2., first select the desired joint tool on the Ribbon menu:

23.8. Creating a joint between two rigid bodies

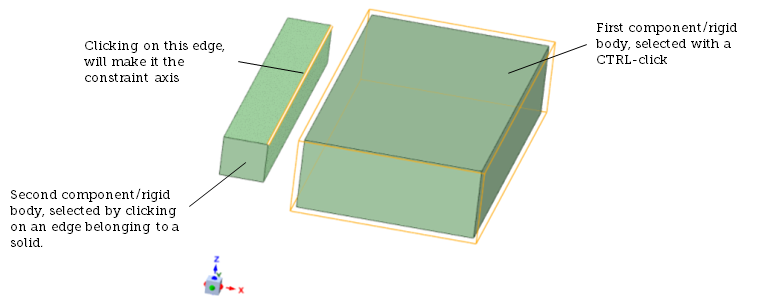
After the first component/rigid body has been selected with Ctrl-click, the second will be based on the solid whose edge is clicked:

After clicking on an edge, the Joint is created at the center of the edge.
An existing joint on the same edge associated to the same components will be replaced with a warning message. Undo will bring back the previous one.
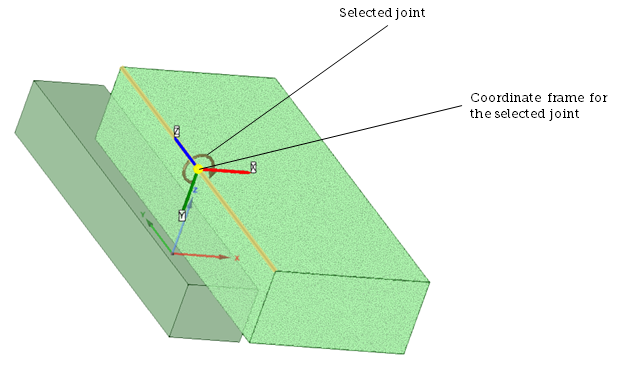
When multiple joints (to different bodies each) are attached to the same edge, the icons will be displaced to indicate more than one joint. The actual transformation of a joint is marked with a coordinate axis, visible when the joint is selected:

23.9. Creating a joint between the world and one rigid body
The workflow for creating a joint between the world and one rigid body is more or less the same as previously described. Just directly click on an edge or a radial line onto which you want to attach the joint. The joint will then attach the rigid body associated to the edge.
23.10. Moving a Joint
By default, a joint will follow the edge onto which it is attached. With the Move Tool a joint can be transformed. After a joint is moved, it will no longer move relatively to the previously attached edge/center-line.
23.11. Restructuring rigid bodies
A previously created joint might be disabled during a restructuring of your simulation. Assume for example you have a joint attached to two components, each belonging to a separate rigid body. If you now merge the two components into one single rigid body, the joint is no longer valid (a joint between one rigid body does not make sense) and will be deleted.
23.12. Joint status
A joint can have different status depending on the state of the joint and the rigid body/bodies it is attached to.
 - Purple. A joint attached between two rigid bodies with motion control Dynamics.
 - Yellow. A joint attached to one rigid body (and the world) or two rigid bodies of which one has motion control Static.
 - Transparent Gray. A disabled joint or a joint attached to one or two rigid body which are disabled, or between two rigid bodies both with motion control Static.
 - Gray. A potential joint detected by the detect joints tool.
 - Orange. A joint with an enabled motor.
23.13. Right Mouse Menu
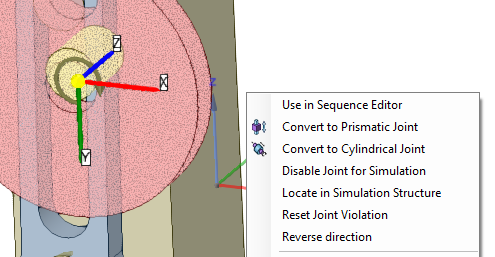
Right clicking a selected joint (in this case, a lock joint) in the graphical view will bring up a menu:
Use in Sequence Editor - Toggles the use of this joint in the Sequence Editor.
Convert to Hinge joint - Convert this joint to a Hinge Joint.
Convert to Cylindrical joint - Convert this joint to a Cylindrical Joint
Convert to Prismatic joint - Convert this joint to a Prismatic joint
Disable/Enable Joint for Simulation - Will disable the joint from the simulation. This will also automatically enable collision between the two rigid bodies.
Locate in Simulation Structure - Will highlight the Joint in the Locate in Simulation Structure.
Reset Violation - Not always available (see below). Reconfigure the joint so that it is non-violated when starting the simulation. (Reset violation).
Reverse direction - This is only available for joints attached to two bodies. This will swap the two attached rigid bodies. Effectively it will also flip the order of the joint.
Reverse direction will cause the simulation recording to the initial state (t=0) and apply the operation. Analogue to changing properties.
23.13.1. Reset violation
When a joint is first created, it will be in a non-violated state, meaning that it satisfies the joint configuration. However, during simulation a joint can be more or less violated, for example by lowering the stiffness in the properties for a given DOF a joint can become flexible. This means that you can effectively have a “charged spring” when you start the simulation. By resetting the violation you ensure that the joint is configured so that the current relative transformation between the two jointed bodies is a non-violated state. This also mean that the current Angular and Linear position will be reset to 0 for Angular and Linear motors. If this option is not available, the joint is not violated.
23.14. Joints with springs
Common to all springs is that they both have a position of static equilibrium (position/rest length), elasticity and damping properties.
23.14.1. Linear spring
A linear spring can be simulated by:
using the linear Spring Joint.
enabling the spring modifier for a Prismatic joint, or the linear spring of a Cylindrical Joint.
23.14.2. Torsional spring
A hinge has a rotational position/angle which describes its equilibrium position. This value can be in the range from -infinity to +infinity. So to define a charged torsion spring, you can enter a position value different from 0. The Angular Spring on a cylindrical joint follows works analogous to the hinge.
It can be enabled using the Spring for a Hinge Joint or the Angular Spring of a Cylindrical Joint.
23.14.3. Damping
The damping is a dimensionless property that describes how oscillations in a system decay when the spring has been disturbed from its position of equilibrium. Remember that when changing the elasticity of a spring, you might also have to change the damping to get the effect you want. See damping ratio (Wikipedia).
23.14.4. Elasticity
This corresponds to the spring constant k according to Hooke’s law (Wikipedia).
23.14.5. Position/rest length
Every spring has a specified length or position at which it is in equilibrium. At this position, the spring will not apply any force to its attached rigid bodies. Pushing or stretching the bodies will move the spring out of this position, hence it will apply a force to restore its position.
23.15. Joint types
This section describes the usage of the different joints in detail.
23.16. Motorized joints
The Hinge, Prismatic and Cylindrical joint can have motors. A motorized joint (with a motor enabled) will be indicated in the simulation structure with one of the following icons:
23.17. Joints with range
The Hinge, Prismatic and Cylindrical joint can also have a range . A joint with a range will limit its motion between an upper and a lower range. The following joints can have a defined range:
23.18. Joint with internal friction
The Joint Internal Friction is valid and available for Hinge (rotational), Prismatic (translational) and Cylindrical (rotational and translational), joints and adds an internal friction force such that:
Note that for Hinge and rotational Cylindrical we’ve a resulting torque. For the friction condition to be dimensionally correct, the axle radius should be included in the friction coefficient, giving:
We have stick friction mode when \(F_{friction} < \mu F_{normal}\) and the objects are sliding when \(F_{friction} = \mu F_{normal}\).
The internal friction is disabled by default. Activate the internal friction via the joint property Internal Friction.
23.18.1. Minimum static resistance force
The internal friction includes a setting for minimal static friction resistance force, meaning there is a friction resistance even with the friction coefficient set to zero, i.e. we will have a friction resistence even when we have no normal forces.
If you also specify a friction coefficient the friction force may exceed the static friction resistance limit, \(F_{friction} = max(\mu F_{normal}, F_{minimum static friction})\).
23.18.2. Normal force
The normal force is calculated differently depending on which type of Joint the internal friction is active on. Given the joint axis is defined to be along/about z, the normal force is defined to be translational force along x (\(F_{normal}^x\)) and y (\(F_{normal}^y\)), which gives us the normal force:
23.18.3. Non-Linear Force Modeling
The friction force depends on the normal force and in some non-trivial scenarios the normal force depends on the friction force. A simple and performance wise fast approach is to use the normal force from the previous time step to calculate the maximum friction force in the current time step. This is the default mode and will not significantly affect the performance but may affect the accuracy of the simulation. E.g., the first time step the friction forces will be zero since there’s no information regarding previous normal force.
For Joint solve types Direct and Direct and Iterative, Algoryx Momentum supports non-linear update of the friction forces given current normal force. This mode is similar to direct friction for contacts and will affect the performance but will also increase the accuracy of the simulation.
23.19. Solve type
Joints are solved together with contacts in the solver. Joints have a property Solve Type which determines which solver is used for the specific joint. For more information see Solvers.


