18. Sequence Editor
The Sequence Editor is one way of adding time dependent actions into a simulation. It is opened using the Sequence Editor button ( ) in the Ribbon menu.
With the sequence editor, a sequence of operations on joint properties can be created. This can be used for example to setup a scene where a robot picks up objects.
18.1. Add a joint to the Sequence Editor
Joints have to be explicitly added to the sequence editor by any of the following actions:
Right click on a joint in the simulation structure and select Use in Sequence Editor.
Right click on a joint in the SpaceClaim structure and select Use in Sequence Editor.
Right click on a joint in the modeling view and select Use in Sequence Editor.
When a joint appears in the Sequence Editor, its properties can be accessed by opening/closing the tree for the joint to the left in the Sequence Editor.
18.2. Remove a joint from the Sequence Editor
Removing a joint from the sequence editor can be done by:
Right click on a joint in the sequence editor and choose Remove joint from Sequence Editor.
Right click on a joint in the simulation structure and de-select Use in Sequence Editor.
Right click on a joint in the SpaceClaim structure and de-select Use in Sequence Editor.
Right click on a joint in the modeling view and de-select Use in Sequence Editor.
Right click on any property of a joint in the Sequence Editor and choose Remove joint from Sequence Editor.
18.3. User interface

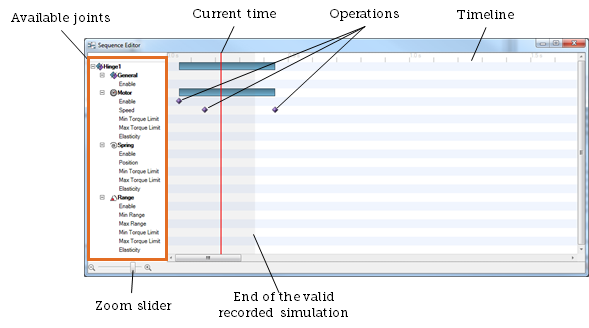
Available joints: This area contains a list of the joints which are marked for use in the Sequence Editor.
Current time: A vertical bar indicating the current time.
Operations: The  icon indicates an operation at a specified time.
Timeline: Show the timeline of the simulation.
Zoom slider: The zoom slider allows you to zoom the time.
End of the valid recorded simulation: This shadowed area indicates valid area of a simulation. As soon as an operation is changed/deleted or moved to the left (earlier in time), this area will shrink, indicating that the duration of the recorded simulation is shortened to capture the changed operation.
18.4. Panning
Panning in the sequence editor can be done with a right mouse down/move up/down.
18.5. Adding operations
Operations can be added in two ways.
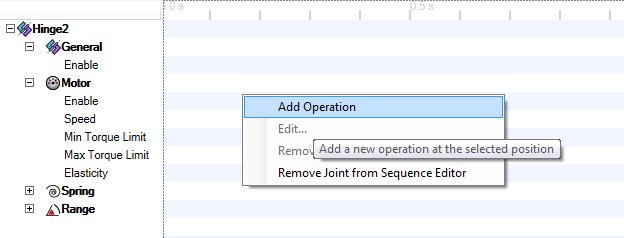
Either mark the correspondent row for a given joint property, move the mouse to a desired time, right click and select the Add Operation menu entry:

or double-click a desired row at the position in the timeline where the operation should be added.
An operation will be marked by a symbol: .. image:: ../images/en/SequenceEditorOperationSymbol.png.
18.6. Moving an operation
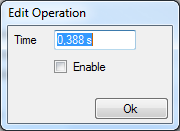
An operation can be moved in time by mouse-dragging to the left or right; or by double-clicking and changing the time:

You can also move all events for a joint by mouse-dragging the vertical bar above the operations left/right.
18.7. Deleting an operation
An operation can be deleted by first selecting it and then pressing delete.
You can also delete all operations for a joint by selecting the vertical bar in the time line belonging to the joint, and then pressing delete.
18.8. Changing an operation
The time and value(s) for an operation can be changed by double clicking the operation and then changing the time/value(s) in the fields.
Attention
Rename your joints to something meaningful. That will help avoiding confusion when working with the various properties in the Sequence Editor.
18.9. Working with operations
18.9.1. Spring
The spring of a joint can be enabled/disabled at a specified time using an operation.
Double-click the Enable row of a spring for a hinge joint to add an operation. Select it to be enabled.
Attention
Note that enabling a spring might give an undesired result. The reason is that the spring will be enabled to its default position, usually 0. This means that if joint has moved/rotated from its initial position, enabling the lock will result in the joint trying to restore the current position of the joint back to 0, potentially with a very large force/torque (if the spring has high stiffness).
If you want to lock the joint to its current position then also add an operation on Position where you check the Use current joint position. This will effectively activate the spring, using the current position as its new default position.
18.9.2. Motor
The motor can be enabled/disabled at any time using an operation on the Enable property. If you want set the motor speed to 0 and keep the current relative transformation between the jointed rigid bodies, you can use the Spring at zero speed property available for all motors. This will keep the speed and retain the current relative position as long as speed=0.